MikroTik RouterOS 的可控性非常的高,並且有內建 Script 功能,如果內建找不到的功能,大部分都可以用 Script 做出來。
如果 Script 也無法做出來,可以透過程式呼叫 MikroTik RouterOS API + VM,所以基本上是沒有任何限制的,只要你寫得出來皆可。
MikroTik RouterOS 的官方教學都只提到 外網負載平衡,並沒有實際運用在 內網負載平衡,Web Load Balancer 可以實作 L4 或 L7 ,本篇實作 L4 的 Web Load Balancer。
要做 Load Balancer 需要分配封包到不同機器,MikroTik RouterOS 提供兩種封包分配方式:
NTH:
如果有兩台伺服器,第一個封包會分配到第一台,第二個封包會分配到第二台,第三個封包會分配到第一台,以此類推。
PCC:
如果有兩台伺服器,用戶進入會依照 Source IP、Source Port、Destination IP、Destination Port 產生一組 hash,依照這組 hash 固定分配到第一台或第二台。
上敘兩種方法 NTH 及 PCC,會發現 NTH 並不適合作 Web Load Balancer,這樣會造成 session 異常,所以必須採用 PCC 方式,以下就採用 PCC 進行設定。
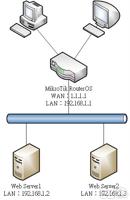
下圖為範例結構:
WAN:1.1.1.1
MikroTik RouterOS LAN:192.168.1.1
Web Server1:192.168.1.2
Web Server2:192.168.1.3
※ 實作以下範例,請確定 NAT 已設定正常,就是 Web Server 可以正常上網,否則可能會無法運作。
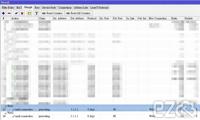
首先新增 Mangle 標記,用戶連線網頁時進行標記,之後才知道要分配到哪台伺服器。
用戶進入的 Public IP 為 1.1.1.1,網頁 Port 為 80,新增兩台伺服器。
第一台:per-connection-classifier=both-addresses-and-ports:2/0
第二台:per-connection-classifier=both-addresses-and-ports:2/1
表示利用 Source IP、Source Port、Destination IP、Destination Port 來進行 hash,分配 2 台伺服器,一台為 0 一台為 1 (起始值0),標記為 Web1 及 Web2。
語法如下:
/ip firewall mangle

add action=mark-connection chain=prerouting comment=Web1 dst-address=1.1.1.1 dst-port=80 new-connection-mark=Web1 passthrough=yes per-connection-classifier=both-addresses-and-ports:2/0 protocol=tcp

add action=mark-connection chain=prerouting comment=Web2 dst-address=1.1.1.1 dst-port=80 new-connection-mark=Web2 passthrough=yes per-connection-classifier=both-addresses-and-ports:2/1 protocol=tcp
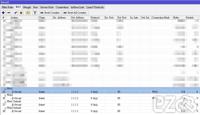
接下來要新增 NAT,才能讓用戶連線到 Web Server。
利用標記 Web1 及 Web2,分配到 192.168.1.2 及 192.168.1.3 兩台網頁伺服器。
接下來再新增兩台伺服器的 NAT,順序在有標記的下方,當有標記的被停用就會自動往下尋找,這樣才能做到異常轉移。
語法如下:
/ip firewall nat

add action=dst-nat chain=dstnat comment=Web1 connection-mark=Web1 dst-address=1.1.1.1 dst-port=80 protocol=tcp to-addresses=192.168.1.2 to-ports=80
add action=dst-nat chain=dstnat comment=Web2 connection-mark=Web2 dst-address=1.1.1.1 dst-port=80 protocol=tcp to-addresses=192.168.1.3 to-ports=80

add action=dst-nat chain=dstnat comment="Web1 Default" dst-address=1.1.1.1 dst-port=80 protocol=tcp to-addresses=192.168.1.2 to-ports=80
add action=dst-nat chain=dstnat comment="Web2 Default" dst-address=1.1.1.1 dst-port=80 protocol=tcp to-addresses=192.168.1.3 to-ports=80
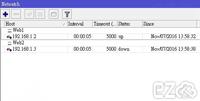
接下要新增 Netwatch,當 Web Server 網路異常自動停用相關 NAT。
偵測 Web Server 的網路無法 Ping,自動執行 Script。
例如:192.168.1.2 連線異常,停用 NAT comment 為 Web1 及 Web1 Default,正常就啟用 NAT comment 為 Web1 及 Web1 Default。
語法如下:
/tool netwatch
add comment=Web1 down-script="/ip firewall nat disable [find comment=\"Web1\"]\
    ;\r\
    \n/ip firewall nat disable [find comment=\"Web1 Default\"];" host=192.168.1.2 \
    interval=5s timeout=5s up-script="/ip firewall nat enable [find comment=\"\
    Web1\"];\r\
    \n/ip firewall nat enable [find comment=\"Web1 Default\"];"
add comment=Web2 down-script="/ip firewall nat disable [find comment=\"Web2\"]\
    ;\r\
    \n/ip firewall nat disable [find comment=\"Web2 Default\"];" host=192.168.1.3 \
    interval=5s timeout=5s up-script="/ip firewall nat enable [find comment=\"\
    Web2\"];\r\
    \n/ip firewall nat enable [find comment=\"Web2 Default\"];"
以上就是 L4 的 Web Load Balancer 設定方法,也可以運用在 TCP 或 UDP。
https://www.ez2o.com/Blog/Post/MikroTik-RouterOS-Web-Load-Balancer
https://www.ez2o.com/Blog/Post/586
留言
[email protected] ( 2025-03-14 )dwseo.ir/ یا ممتازی مارکتینگ /سئو ساعتی باقیمت مناسب و طراحی سایت فروشگاهی