一般如果要回傳多個值會建立一個 class,然後再使用class方式回傳。
例如:
        public class Info
        {
            public int UserID { get; set; }
            public string UserName { get; set; }
            public bool UserSex { get; set; }
        }

        public Info GetInfo()
        {
            return new Info
            {
                UserID = 1,
                UserName = "小明",
                UserSex = true
            };
        }
也可以使用 Tuple 方式進行回傳,但是此方式不易辨識值的名稱,可能會造成程式混亂,所以自行判斷是否使用。
        public static Tuple<int, string, bool> TupleGetInfo()
        {
            return new Tuple<int, string, bool>(1, "小明", true);
        }

        private static void Main(string[] args)
        {
            Tuple<int, string, bool> Info = TupleGetInfo();
            int UserID = Info.Item1;
            string UserName = Info.Item2;
            bool UserSex = Info.Item3;
            Console.ReadLine();
        }
副檔名(Filename Extension,或作延伸檔名、字尾名)用來標誌檔案格式的一種機制。例如「example.txt」的檔案,example是主檔名,txt為副檔名,表示這個檔案是一個純文字檔案,句號「.」就是主檔名與副檔名的分隔符號。
以上就是什麼是附檔名,相信如果你是看這篇的人,因該早就知道了。
當您提供一個圖片上傳服務,如果沒有檢查圖片的真偽,就有可能造成漏洞。
通常工程師會限制副檔名,但如果圖片夾帶PHP,駭客就可以利用此方式攻擊你的伺服器。(本篇不探討此攻擊方式)
假如您的伺服器限制只能上傳 JPG,但用戶天真的將 BMP 改為 JPG,此種方式就可逃避偵測,如果直接將檔案儲存到伺服器,就會造成容量、流量爆增。
最簡單的解決方法,就是使用程式將圖片讀取出來,並且重新儲存即可。
此方法雖然可行,但會造成多餘的資料處理量。
每種圖片格式都有特定的檔案標頭,利用此方式偵測檔案格式,如下:

上一篇介紹了:Windows 10 IoT 網頁控制燈泡閃爍 Web Blinky 範例 ( Raspberry Pi 2 )
只要稍回變更一下線路,並加上繼電器,就可以變成超夯的雲端智慧電源!
本實驗必須使用到 AC 110V 市電,有一定的風險存在,如不熟悉請再三確認後再進行通電!
如果覺得風險過大,請勿自行實驗,所有實驗過程請自負風險。
必須準備以下零件:
- Raspberry Pi 2 樹莓派,並且安裝 Windows 10 IoT 作業系統
- 5V 繼電器模組一顆,必須為 高電平 接通的 ( 3.3V 也可以,不過 VCC 要改成 3.3V )
- AC 電源 插座 及 插頭
- Smart Power 範例檔案
繼電器(Relay),也稱電驛,是一種電子控制器件,它具有控制系統(又稱輸入迴路)和被控制系統(又稱輸出迴路),通常應用於自動控制電路中,它實際上是用較小的電流去控制較大電流的一種「自動開關」。故在電路中起著自動調節、安全保護、轉換電路等作用。
以下就是 繼電器 的樣子,中間 藍色方形 的就是 繼電器,通常 繼電器 為 黑色、藍色、灰色。

上一篇介紹了:Windows 10 IoT 燈泡閃爍 Blinky 範例 ( Raspberry Pi 2 )
本篇為上一篇的進階版,如不了解 GPIO (General Purpose Input/Output) 或 Blinky 硬體配置,請先閱讀完上一篇,才不會接不上本篇。
本篇需使用到 App2App WebServer 範例,內含兩個方案 BlinkyApp 及 WebServerApp,兩個專案都要上傳到 Windows 10 IoT 才能運作。
如果沒有範例,可以參考此篇:http://www.ez2o.com/Blog/Post/Windows-10-IoT-Hello-World-Use-Raspberry-Pi-2
步驟一:
開啟 WebServerApp 資料夾內的 WebServerSolution.sln。
上一篇介紹了 Windows 10 IoT 的 Hello World 如何撰寫。
可以參考:http://www.ez2o.com/Blog/Post/Windows-10-IoT-Hello-World-Use-Raspberry-Pi-2
本篇要示範 燈泡閃爍 Blinky,此為 GPIO (General Purpose Input/Output) 的基礎操作,也是 物聯網 最基本的電路練習,務必要通盤了解清楚,日後開發上才會得心意手。
必須準備材料如下:
- Windows 10 IoT ( Raspberry Pi 2 )
- 麵包板 x 1
- 杜邦線 x 2
- LED x 1
- 220歐姆電阻 x 1
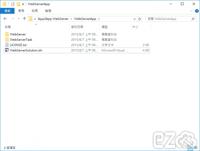
本篇需使用到 BlinkyHeadless 範例,開啟 BlinkyHeadlessCS.sln。
如果沒有範例,可以參考此篇:http://www.ez2o.com/Blog/Post/Windows-10-IoT-Hello-World-Use-Raspberry-Pi-2
所有程式的第一支必定是 Hello World ,所以本篇就介紹 Hello World 吧!
Windows 10 IoT 支援 C# , Python , Node.js,本篇使用 C# 作為範例。
必須具備以下軟體才能撰寫 Windows 10 IoT 程式:
- Windows 10 OS
- Visual Studio 2015
- Windows IoT Core Project Templates ( 如果想要 Templates 功能才需要安裝 )
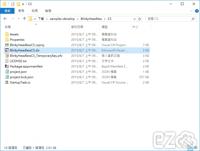
官方範例下載:https://github.com/ms-iot/samples/archive/develop.zip
本站下載(備用):samples-develop.zip
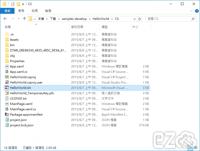
開啟下載好的範例檔案 HelloWorld.sln :
在ApiController讀取用戶IP
string IP = ((HttpContextWrapper)Request.Properties["MS_HttpContext"]).Request.UserHostAddress;
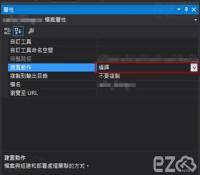
只需在App_Code底下的*.cs按下滑鼠右鍵"屬性",將"建置動作"改為"編譯",就可以正常讀取。
開啟IdentityModels.cs,新增要加入的欄位,例如:
public string ApiKey {set;get;}

以往計算資料夾容量,需要使用迴圈計算檔案容量,然後在加起來,例如:
        private static void CalculateDirectorySize(string DirRoute, ref long totalSize)
        {
            foreach (string Route in Directory.EnumerateDirectories(DirRoute)) CalculateDirectorySize(Route, ref totalSize);
            foreach (FileInfo file in new DirectoryInfo(DirRoute).EnumerateFiles()) totalSize += file.Length;
        }
雖然可以計算,不過效率不太好,改用內建的 Scripting.FileSystemObject,速度會快上許多:
        private static long CalculateDirectorySize(string DirRoute)
        {
            try
            {
                Type tp = Type.GetTypeFromProgID("Scripting.FileSystemObject");
                object fso = Activator.CreateInstance(tp);
                object fd = tp.InvokeMember("GetFolder", BindingFlags.InvokeMethod, null, fso, new object[] { DirRoute });
                long ret = Convert.ToInt64(tp.InvokeMember("Size", BindingFlags.GetProperty, null, fd, null));
                Marshal.ReleaseComObject(fso);
                return ret;
            }
            catch
            {
                return 0;
            }
        }